How To Fill A Flask Without A Funnel?

The hydro flask is ideal for travelers and sports enthusiasts. Thanks to its design, it has unique properties, such as making you hotter or colder for longer. However, filling it out without using a goal-achieving process can be a challenge. In this article, we will look at some tips and tricks for filling a hydro flask easily and quickly.
How to Easily Fill a Hydro Flask Without a Target Reaching Process: Tips and Advice
Before filling your own bottle, you need to make sure you have all the tools you need. You will need water, which is the inside cover of the bottle, and if you plan to use the bottle while camping or at the beach, you may need additional tools such as a barrel or shower head.
If you decide not to use the goal-achieving process, one of the most important factors is to arrange the flow of water. It is important to go very slowly so that the water does not flow around the flask. A way to control the jet is to insert air ducts or tubing, all of which can be placed at the top of the flask. This makes it easy to fill the bottle without spilling water.
Filling a hydraulic flask without a funnel: tips and recommendations
Filling a hydraulic flask without using a goal-achieving process can be difficult, especially for younger users. However, there are a few tips and tricks that can make the process easier and more comfortable
Use ice
One of the best techniques for filling flasks without the goal-attainment process is the use of ice. Place an ice cube in the neck of the bottle and let it melt. Remember to wash the vial before use.
Tilt the flask
If ice cannot be reached, tilt the Erlenmeyer aside slightly and carefully pour in water. This allows you to pour the water carefully without requiring a target reaching process.
Use a spoon
A spoon is another excellent tool for filling field bottles. Dip the spoon into the neck of the field bottle and pour in the water. This method is similar to using a funnel and prevents water from spilling.
- Remember to wash the field bottle regularly.
- If filling the field bottle during the run, use each available surface, such as the ground, to simplify the process.
- If spilled water is a concern, use your own Hydro Flask funnel that fits perfectly into the field bottle.
In general, filling a hydraulic flask without using a goal-achieving process is not as difficult as it seems at first glance. By following our tips and advice, you can easily and quickly fill your own bottles and enjoy the sweetest and freshest water in every room, at any time.
Prepare for filling
Before you can begin filling your hydro flask, you need to prepare. First, you must make sure the bottle is clean and dry. If the bottle has been used previously, it must be thoroughly washed and dried.
Also, make sure before filling that all the important ingredients are present. Filling the hydro flask requires water and aids such as a flexible hose or bait.
If the water to be filled is water plant or other contaminants, a special filter must be applied. The water must be unpacked and freshened so as not to spoil the taste of the drink in the flask.
It is important to remember not to fill the bottle to the end, but to leave space at the top. In this way, you will definitely prevent your water from spilling and the drink will remain good for a long time.
- Make sure the bottle is clean and dry
- Make sure that all important accessories are present
- Use clean and fresh water.
- Fill only when the bottle is full.
Clean the bottle
Make sure the hydro flask is completely clean before filling it with your favorite beverage. For this, wash the bottle with hot water and soap. Using a soft brush or sponge, thoroughly clean the inside of the bottle.
If the vial contains a strong odor or taste, it can be cleaned by diluting the acetic acid with water. For example, dilute one part of acetic acid to three parts water and pour into the vial. Let the solution stand for a few minutes, then rinse the Erlenmeyer with clean water.
Make sure the vial is dry before use. Do not leave the vial with wet drink residue. This can lead to the development of bacteria from inside the vial and an unpleasant aroma. Dry immediately with a soft cloth or clean paper towel.
Prepare drinking water before filling the hydro flask. The best option is to use filtered, distilled, or bottled water. Tap water contains chlorine, viruses, and other contaminants that can affect the taste and quality of the water. The water must also be room temperature or cooler to keep it up to temperature in a hydraulic flask.
If you plan to use a direct water source such as a river or lake, make sure the water is safe. You may need to use a water treatment system to ensure that the water is not dangerous to drink.
If adding drinks such as sports drinks or juices, make sure they are diluted at the proper level to maintain the temperature and quality of the drink in the hydro flask. Follow package directions for correct mixing.
Do not use drinks that contain gas, such as carbonated beverages. Gas can put pressure on the hydro flask, which can lead to leaks and damage to the bottle.
Filling Techniques
Filling a hydro flask is a simple task, but there are some important details that need to be considered to maintain the reliability and efficiency of Thermos bottles.
- Before you begin filling the bottle, you must ensure that the ends of the bottle are properly closed to prevent leaks during filling.
- Place the Thermos bottle on a flat surface to prevent it from tipping over during filling.
- While it is possible to fill a hydro flask using a regular tap, it is better to use a special nozzle bottle so the bottle can be filled faster and literally.
- Pour the bottle when the bottle is full – if you want to use a hot thermos for traveling or swimming, leave room for water movement.
Follow these basic tips and you can fill your hydro flask and enjoy fresh, cold, or hot water!
Hold the bottle the right way!
To fill your hydro flask without using the goal-achieving process, you must hold it the right way. Do this by using both hands to properly hold the bottle. If you leave the bottle tilted, the liquid may flow and you will have to start over.
If the weight makes it difficult to maintain bottle level, use support or place the vial on a flat surface. Make sure the vial does not roll out and is standing on the floor while being filled.
If using a valve to fill the vial, make sure it is at the level of the vial. If below the level, liquid will flow out of the vial, or if above the level, the vial will be difficult to fill.
Finally, if you still have the hydro flask, use it as a funnel. Place one bottle on a flat surface and affix the other bottle to the fill valve. Now you can pour the liquid into the second bottle without fear of it spilling on the floor.
Tilt the flask
To make it easier to fill the hydraulic flask without using the target-reaching process, you can tilt the bottle at a specific angle. To do this, you must choose an angle at which the liquid flows evenly and without selection.
The right angle can be determined by testing. The flask should be placed at various values and a small amount of water poured into it. If the angle is correct, you can experiment to find the right angle. You must place the Erlenmeyer at different angles and pour a small amount of water.
If the angles are correct, the flask can be filled without problems and without tools. This method can also be used to fill the pot if there is no possibility to use a funnel.
Fill the measuring flask slowly
An important piece of advice when filling a hydro flask is to do it slowly. There is almost no hurry! In fact, no rushing!
Slowly fill the bottle in batches. If you pour a very large amount of water right away, it can ruin all your trouble and ruin all your trouble.
- Loosen the lid before you start filling the field bottle.
- Keep the Field Bottle upright and do not tilt it.
- Divide the required amount of water into many casts.
It is also important to monitor the water level during filling. If you are pouring most of the quantity you want, do not run the risk of going Because it is difficult to determine if you have enough against the white background of the hydro flask.
Take your time! Remember to pour water into the hydro flask in stages and monitor the water level.
Advantages of Filling Without Target Reaching Process
Time-wise and comfortable. Filling bottles without a funnel saves time and works in a comfortable way.
Space Savings. If funnels are not available, there is no need to bring tools to fill them. This is even more important in camp situations where every kg charge must be taken into account.
There is no waste. When using the funnel, water flows. This produces waste. On the other hand, filling without a funnel reduces the amount of waste and pollution of the environment.
Reduces the risk of bottle damage. When filling without a target-reaching process, can damage is very likely if there are sharp food particles or fixed particles in the can. Filling without a funnel reduces the likelihood of damage to the vial and extends its life.
Filling with water in irregular positions is easy. Without a funnel, the small angle at which the flask is tilted during filling, is a simple process and prevents excessive outflow of water.
Space – Savings
If you want to save space when transporting a hydro flask, there are many tricks; one is to choose the smallest size pot; another is to use the smallest size pot you can find. Hydro flasks are available in all kinds of sizes, from 12 oz. to 64 oz.
Another way to save space is to store bottles in a collapsible bag or book bag. Some hydro flask models are formed to fit easily into a secondary bag or branch in a handbag.
If you have a hydro flask, special holders are available to keep the bottles tidy and save space during transport. Useful for intensive entertainment, exercise, or car trips.
– Select field bottles with the smallest volume
– Wear in bags or backpacks where field bottles can be stored
– Use special holders for multiple cans
Can fill it anywhere
The hydro flask is not a regular field bottle, but an active tool that can be used in a variety of situations. It can be filled anywhere, which is one of the greatest advantages of this model. It will be an indispensable help not only in sporting events but also in everyday life.
The most important thing is access to water. Tanks can be filled from taps as well as from sources, lakes, and rivers. It can be used in urban areas or in nature.
Another important point is ease of filling. Hydro flasks are equipped with a wide range of widths and are quickly filled and packed without problems. If you go to a freshwater reservoir, do not forget that it must be well rinsed from the inside to remove unwanted impurities.
Given all the above excellent qualities, we can safely admit that the Hydro Flask is the right model for everyone. Not only is it comfortable and functional, it is also ideal for those who are concerned about their wells and just want to drink clear, fresh water.
Prevents water waste
One of the most important tasks when filling a hydraulic flask without a target reaching process is the prevention of water waste. It is not uncommon for liquid to spill aside and end up in the bottle opening. However, there are a number of techniques that can make it possible to prevent water waste
- Select a spot point. Before starting the process, select an exit point that is below the Erlenmeyer value. This prevents water from turning sideways.
- Use a narrow neck barrel. If you have a narrow neck, for example, a narrow barrel of limited glass, you can use this as a funnel. Pour water into the glass and apply it to the flask opening.
- Support from a buddy. Ask your buddy to place the flask over the hole and pour the water yourself. In this way you visibly keep control of the process and prevent water waste.
Follow these tips and you can fill the water flask without using a funnel.
Hydro Flask Maintenance
The Hydro Flask is a quality product that will last for years when you follow the maintenance instructions.
Cleaning: Remember to clean the bottle after each use. Use a soft brush or sponge to remove any debris that may eat or drink inside. You can use soap and hot water if needed but do not use abrasives that may damage the surface of the vial.
DRYING: After cleaning, thoroughly rinse the bottle with water and head down to dry or use a microfiber to remove water. Do not let him airtight as it can grow bacteria.
Storage: Store the hydraulic flask in a cool, dry place and out of direct sunlight. Do not allow the bottle to come in contact with oil, acidity, solvents, or other chemicals. If you plan not to use the bottle for an extended period of time, it is recommended that you leave it open.
Cap and gasket replacement: If the bottle comes with a cap, the company recommends replacing the hydro flask every 6 months to ensure the cap remains properly closed. Auxiliary gaskets can be purchased from the manufacturer’s website or the store where the bottle was purchased. If the ends are damaged or lost, replacement caps can be ordered.
MAINTENANCE: If you experience problems with your Hydro Flask, contact the manufacturer’s service center or the store where you purchased it for assistance.
Clean the bottle after use
Once your own hydro flask is complete, do not forget to clean it. This will certainly help prevent unpleasant odors and bacterial infections.
You may think that simply washing the bottle under the tap is enough, but that is not always enough. Especially when used for drinks that are not composed of water. Drinks with the highest concentration of sugar have the opportunity to forget the remains attracting viruses.
For deep cleansing, a bottle brush and soap should be used. Clean every inch of the internal surface carefully and meticulously. If there is a bottle dispenser, it is recommended that it be cleaned regularly.
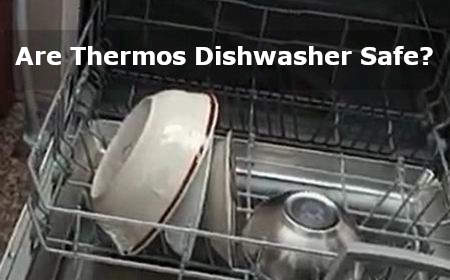
Remember that hydro flasks are not suitable for use in dishwashers or microwave ovens. The use of abrasive cleaners or bleach is not recommended.
And remember to place clean bottles in a bag or on a shelf, close the lid, and do not place in the sun to prevent mold or unpleasant odors.
Do not use bleach!
To properly care for your hydro flask, you must use a detergent that does not contain aggressive ingredients.
Do not use bleach as it can damage the substances in the bottle. These chemicals have every chance of damaging the coating or lid of the bottle. This will negatively impact the function and appearance.
To clean the dining room, choose a cleaning method based on natural ingredients. These are special cleaning agents for jugs, soaps, and baking soda. They can be used with warm water to remove all stains and will not destroy the paint in terms of the bottle.
– Do not use bleach cleaners.
– Choose detergents based on natural ingredients.
– Clean the flask with warm water and detergent.
Remember that proper care of the non-spherical nature will prolong its life and protect its original appearance and quality.
Store bottles without caps
One of the best ways to keep your own hydro flask in good condition is to keep it without a cap. Bottle ends can often retain water and odors, which can cause unpleasant odors from the inside. If the bottle ends are not dismantled before storage, unused residual water can freeze and ensure unpleasant results.
When holding a hydro flask without a lid, it is important to remember the density of the bottle. Without a lid, the bottle could be more exposed to moisture, dust, and other contaminants. If you use field bottles while traveling, walking or picnicking, you should use a special cover for the field bottle that protects the bottle.
When holding a hydro flask without a lid, it not only prevents unpleasant odors but also extends the life of the bottle. Remember, however, that you must be careful without the lid that there is no contamination from the inside. Remember that with the lid, the vial must be absolutely closed before placing in a backpack or board.
Questions and Answers
Question: What contents do you recommend for a hydro flask for a trip of several days?
ANSWER: If you plan to travel for a few days, it is best to choose a 32-40 oz. bottle. For example, you can store enough water for the entire travel phase.
Question: How often do I need to change the water in my hydro flask?
Ans: Water changes depend on the environment you will be staying in. When it is hot outside, you will need to change the water frequently, every few hours. During colder months, you can change the water more frequently, once a day for example. Remember, however, to keep the flask clean and sterilize it after each use.
Q: How can I fill a hydro flask if there is little or no pressure in the normal water line?
RESPONSE: If you do not have easy access to a water pipe, or if the pressure in the pipe is low, you can use a pump to fill the field bottle. This method is ideal for filling field bottles outdoors, for example, on a camping trip.
Question: How do I care for and clean my hydro flask?
Answer: The hydro flask should be cleaned under running water with a brush and soap. A solution of acetic acid or baking soda can be used to remove unpleasant odors from the bottles. Do not put field bottles in the microwave or dishwasher. This could damage insulation and increase adverse conservation effects.
Question: What is the advantage of the Hydro Flask over its counterpart?
Answer: One of the most important advantages of the Hydro Flask is its ability to protect the temperature of the water: it stays cold for 24 hours and warm for 12 hours. They are also made of strong stainless steel, making them durable and resistant to punching and damage.